I like CloudApp. I use it every day for sharing information with other people. I especially like how it can autoupload screenshots I take on my Mac. Trouble is, it makes a real mess of my desktop.
It goes something like this: I press ⌘-SHIFT-4, OS X takes a snapshot and saves it to the desktop. CloudApp sees this new image, uploads it immediately and copies the url to my clipboard. I paste it in a chat or email. Boom—I’m sharing screenshots fast enough to make people’s head spin. Except after a few days of this, my desktop looks like it should be featured on an episode of Hoarders.
“Take Your Snapshots Elsewhere”
Thankfully, my buddy Matthew told me how to get OS X to save screenshots to a different location. I created a new folder called “CloudApp” inside my Pictures folder and ran the following commands in Terminal:
$ defaults write com.apple.screencapture location '/Users/plasticmind/Pictures/CloudApp'
$ killall SystemUIServer
Be sure to replace the path with the appropriate path for your folder and don’t forget to restart CloudApp after this so it can pick up this new location.
If you take a snapshot now, CloudApp should grab it from the new location. The desktop is clean again! This is great, but it still means that I’ve got a folder I’ll need to remember to clean out in a few months. Yuck.
I figured I could do better.
“Clean Up After Yourself”
At first, I tried saving the screenshots to the Trash, which worked; but CloudApp wouldn’t autoupload from that folder. So I decided to create an Apple script that would automatically purge my new CloudApp screenshot folder.
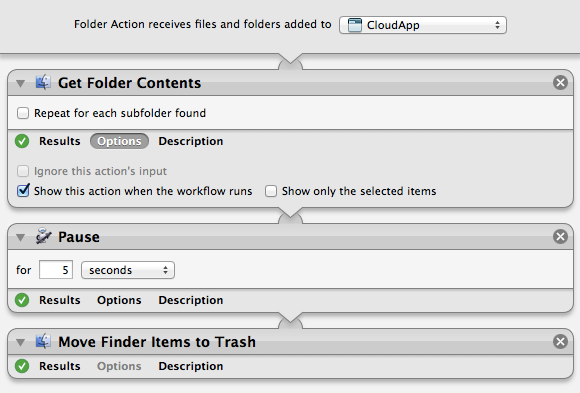
Here’s what I did, in a nutshell. I created an Automator script and set it as a Folder Action to my new folder, so when a new screenshot gets added to it, this script gets run. It selects the new file, waits for a bit to be sure CloudApp has time to upload it, then moves the screenshot to the Trash.
Step-by-step instructions:
- Run Automator and select “Folder Action”.
- First, choose the new folder you created from the dropdown.
- Then, add the following actions, in order: Get Folder Contents, Pause, Move Finder Items to Trash
- Set the pause time to 5 seconds.
- Save (name it whatever you’d like).
If you did it correctly, you should be able to take a snapshot and get a quick autoupload from CloudApp without all the clutter.